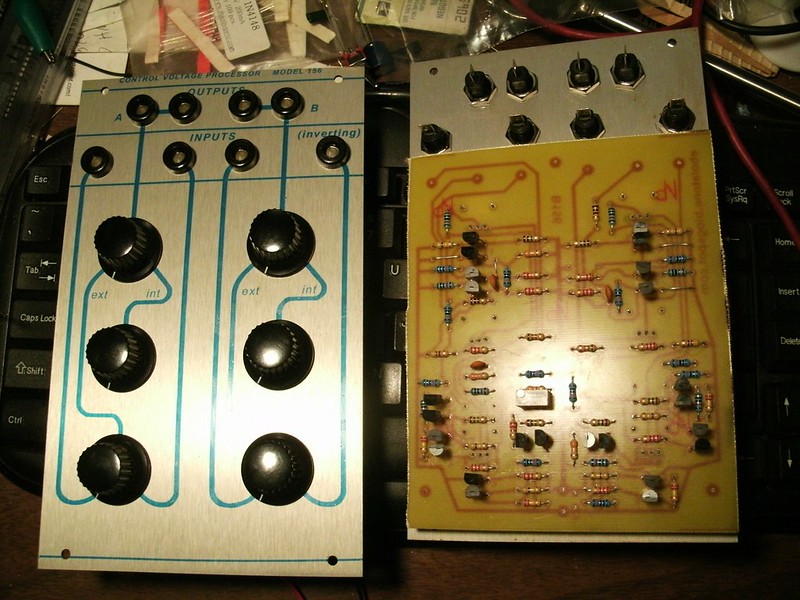
Left, prototype with panel suffering from a bit of Lazertran "stretch"; right, latest edition module in process.
Final version.
This is a true clone directly from the schematics.
A good reference for learning and using this module and other 100 modules:
http://manuals.fdiskc.com/flat/Buchla%20100%20Series%20Owners%20Manual.pdf
This module can be essential in using 100 series modules which have only a single CV input jack such as the oscillators, which do not have CV mixing on-board...their front panel Frequency controls are defeated to allow external CV to modulate the oscillator. If you wish to control an oscillator by a CV keyboard or sequencer AND add another pitch modulation effect you'll need to use a section of the 156. The good news is that the 156's center Offset pot then replaces the oscillator's Frequency control, when you set the top 156 pot to the center or so. Of course, the keyboard or sequencer must then be tuned to produce the desired pitches because any fading between two sources will (LIKELY, CHECK) cause compression of both. Haven't fully put this thing to use yet; that's what I'd believe it does in actual use, will confirm. I've never played a 100 system and there are very likely unexpected quirks to be discovered and applied musically...
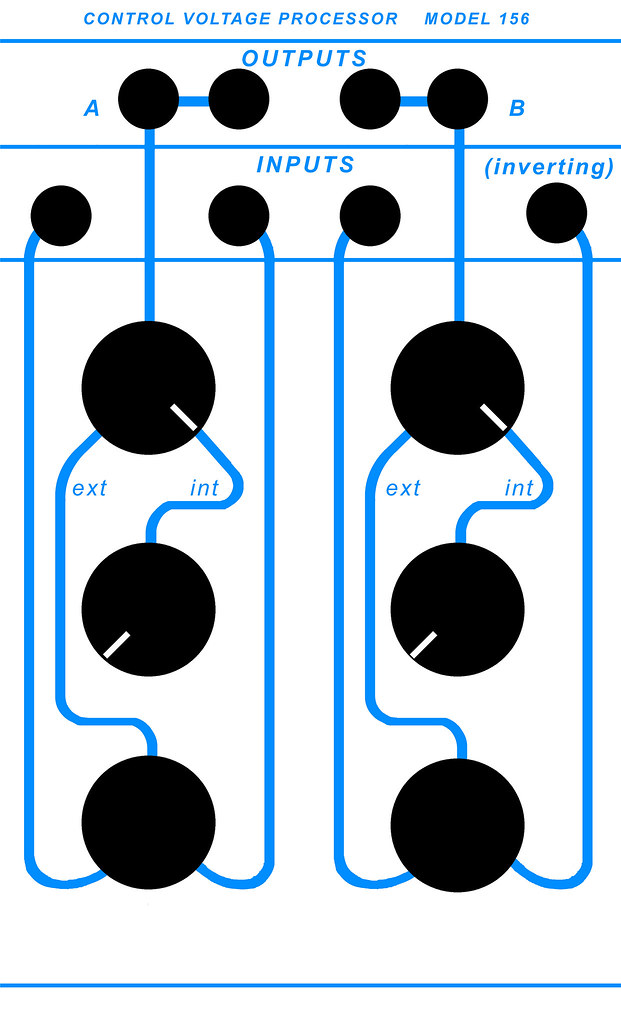
The two sections, alike but for one difference, allow you to manually mix/crossfade CVs as well as offset them with a 15V range, which of course is standard System 100 voltage. The second (right side) section has an inverting input which flips 0-15V CVs to 15V-0V for contrary motion modulation, etc. The top pot fades/mixes between the external input mixing and an internal offset generator which provides 0-15V. In other words, you can compress an input voltage to 1/4 of its range, for example, and then shift it to vary only around 5V or wherever you wish. You can also use the offset generator alone to manually sweep any CV'd parameter(s).
So in other words, the 156 acts as front panel Frequency control and a crossfade of up to two CV sources if you're using it with oscillators, filters, etc. It is basically what was integrated into the 258 oscillator series: front panel frequency control summed (simultaneously available) with the attenuated CV inputs.
Use with 200 and 200e series modules which produce and expect a 10V CV modulation range should work fine unless you offset things above 10V. I'm not sure what will occur but likely the top 5V will simply get ignored.
This is not as simple a build as it appears. There are 58 resistors...
There is a caveat in use; the module produces large voltages at its outputs via the external processors when any of them are unpatched/not connected to another module. Sweep the int/ext pot to eliminate this or unpatch the module entirely if not in use. When you patch into it, it settles to near zero volts...weird, but the 144 acts the same way...if you set it to Ext CV, it oscillates at an unexpectedly high frequency until you patch into the CV input..also, there is some stray voltage offset at the outputs even with the inputs set to zero, so expect up to 0.35V or so in actual use.
Requirements:
Ground and +15V power rails.
Parts:
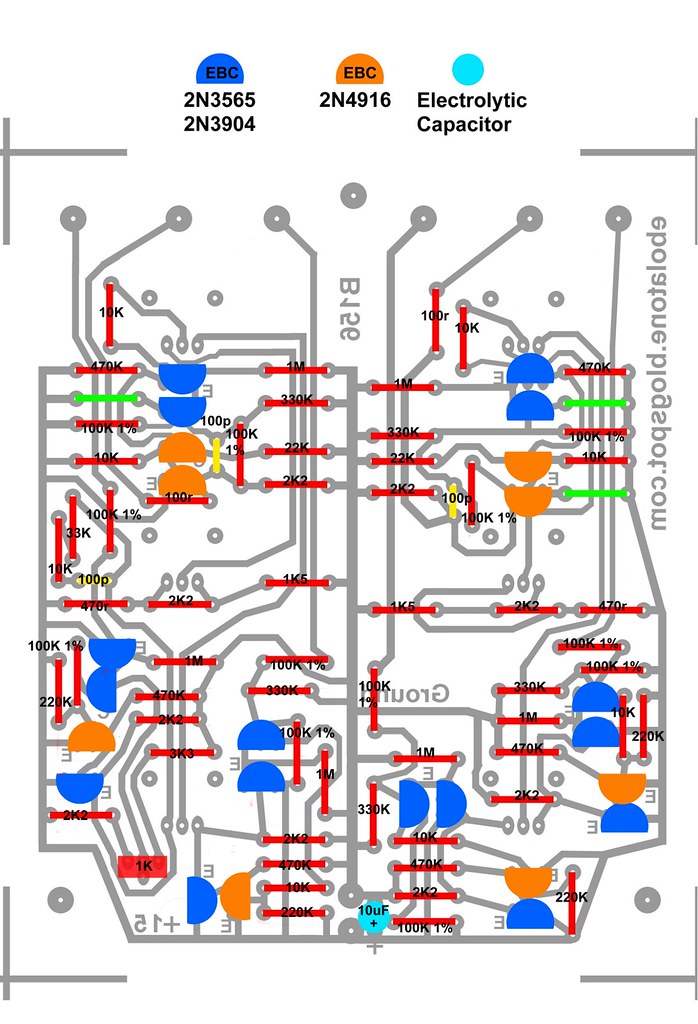
Five pairs of decently-matched for voltage 2N/PN3565, 2% or better is plenty. I've just built one using 2N3904 and it works just fine. (The matched sets are visible in the layout/parts legend as the blue pairs.)
Four unmatched 3565.
Eight 2N4916 transistors. 2N3904/6 might work just fine; I've tested modules using 3904 to replace 3565 and it works well. Haven't replaced 4916 with 3906, however.
BC5XX are also applicable as are equivalent Japanese generic NPN/PNP.
There are no unusual resistor values and I've even eschewed carbon composition for this build. The original used mostly 10% types with some 5% specified and several 1% 100K. Using all 5% carbon film resistors is fine excepting of course the indicated 100K 1%. Using all 1% metal film is also fine, but don't expect this module to be an engine of precision. And that's perfectly fine...
Three 100pF ceramic capacitors with a 5mm pitch (distance between legs). One 10 or 15uF electrolytic capacitor for power smoothing, 35V or more.
The recommended trimpot is a Mouser 858-67WR1KLF. The etch footprint also allows for use of the 858-67YR1KLF. At the time of this writing both are $1.24 each. Not bad for a multiturn trimmer!
Four 10K linear and two 250K linear Alpha 9mm PCB-mount snap-in potentiometers from Mammoth Electronics or from THONK, with the nub already removed.
Six Davies 1610 knobs. Mouser: 5164-1610AA
Options:
You can hand-wire the PCB to front panel potentiometers of your choice (four 10K linear and two 250K linear per module) or use snap-in PCB-mount 9mm Alpha types, available from Mammoth Electronics and mount them to the PCB on the solder side, and the front panel then directly upon them.
I recommend using three washers on each pot (if you're using Alphas) behind the front panel to lift things to a perfect distance for the Davies 1610 knobs. They'll sit just the right distance from the front panel when you put them all the way onto the shaft that you can simply tighten them down instead of worrying about spacing by hand or other tricks.
Three washers (available at Mammoth as well, in the Accessories/Hardware section) are a touch under 12mm tall off of the PCB.
There are drill marks on the PCB for three standoffs but I've not yet determined the appropriate height. They may be completely unnecessary as all six pots secure to the front panel.
Schematic:
http://rubidium.dyndns.org/~magnus/synths/companies/buchla/Buchla_1560_1_200.jpg
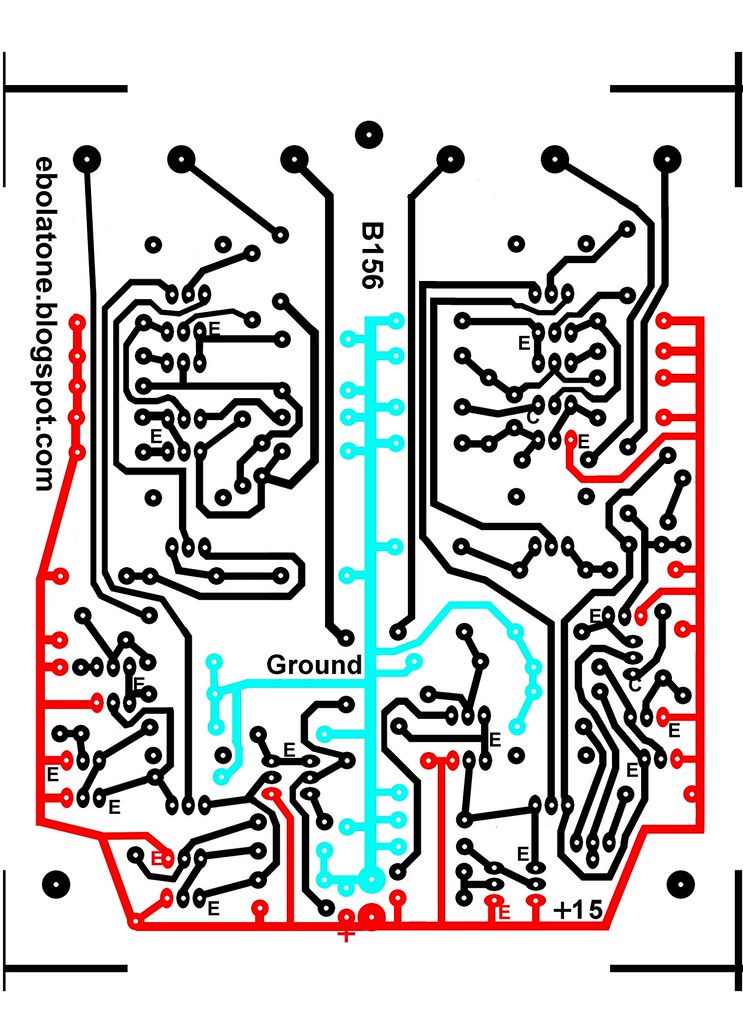
Etch:
Download the correctly-sized high-resolution PDF by clicking here. One image is reversed for printing upon transparency material for exposing PCBs.
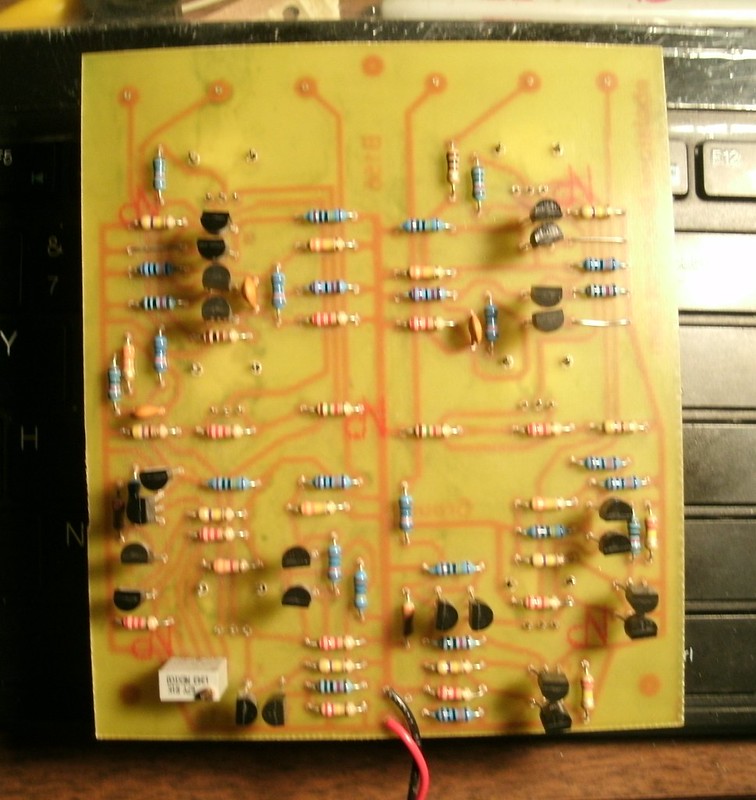
Continuity check:
The trace side of your PCB should look like this, not literally meaning the coloration. With a beeping VOM continuity meter, make sure that the positive and ground lines are not bridged and that every point of each has continuity.
Parts legend:
Build:
All holes in the PCB can be done with a #65 drillbit excepting the potentiometers'. Use a #60 drillbit (1mm) for all potentiometer pads.
Solder in all of the resistors first, then the capacitors. Solder the three jumpers. Sorry; I dislike them but couldn't get around having to have three. Now the transistors. Note that the layout is for both types to have EBC pinout. Solder the 1K trimpot. You can use a single-turn top-adjust or a multi-turn type; your choice.
Make sure all of the transistors are correctly installed.
Flow solder on the traces if you wish for reliability, or coat the traces. Deflux the board.
You'll have to make some modifications to each potentiometer as follows:
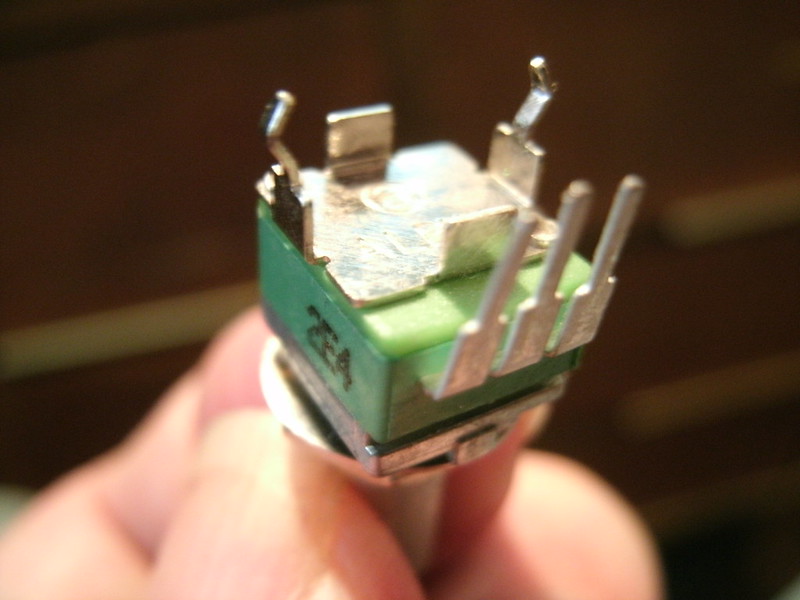
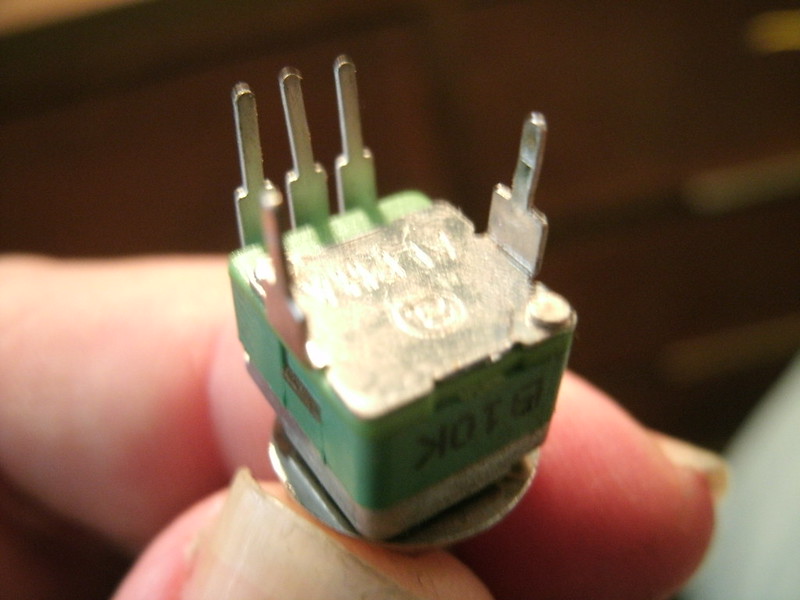
Stock Alpha 9mm PCB-mount snap-in potentiometer, unmodified.
The two spacing tabs need to be removed. This is as simple as grasping each with a plier and rocking it back and forth until it breaks off.
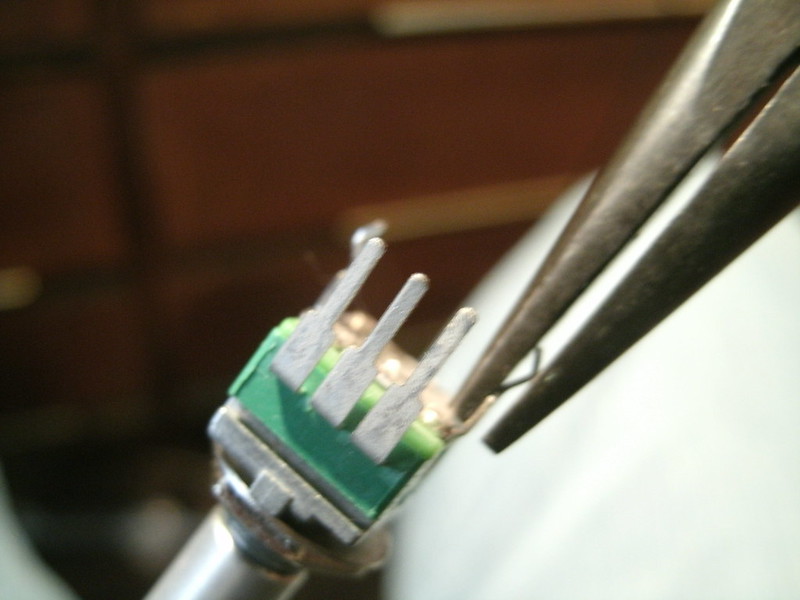
The two mounting legs need to be straightened; simply pinch them with a plier:
And a metal nub at the front must be removed; a dyke hand tool or a large pliers can take care of this:
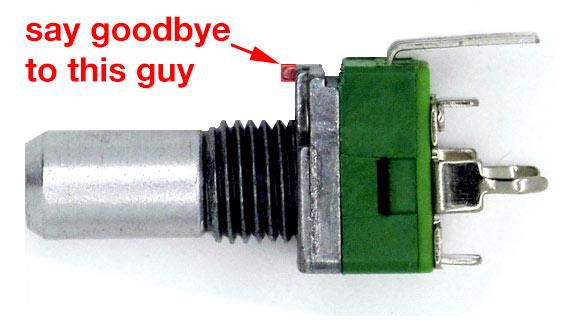
Image via THONK, who sell these with the nub already removed. Thanks!
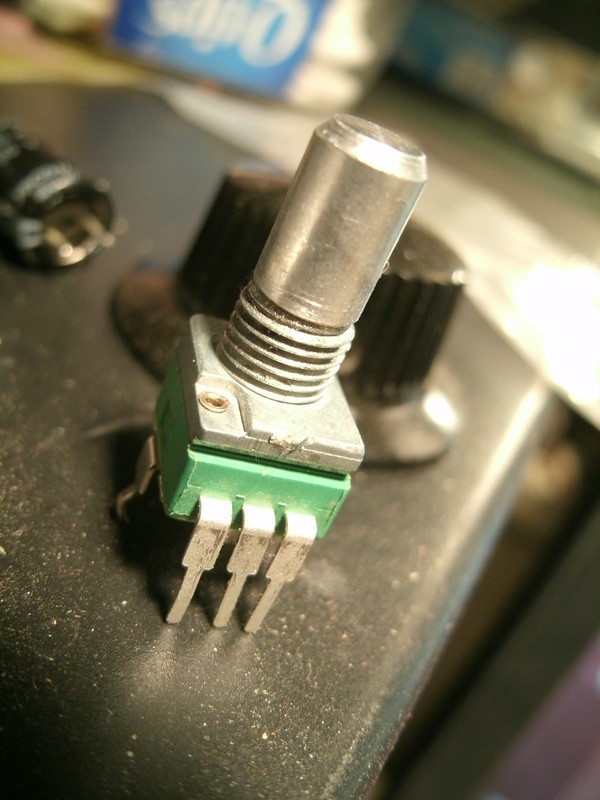
Finished! This is what they'll need to be for this build.
THONK will be stocking these with the nub already removed:
http://www.muffwiggler.com/forum/viewtopic.php?t=122962
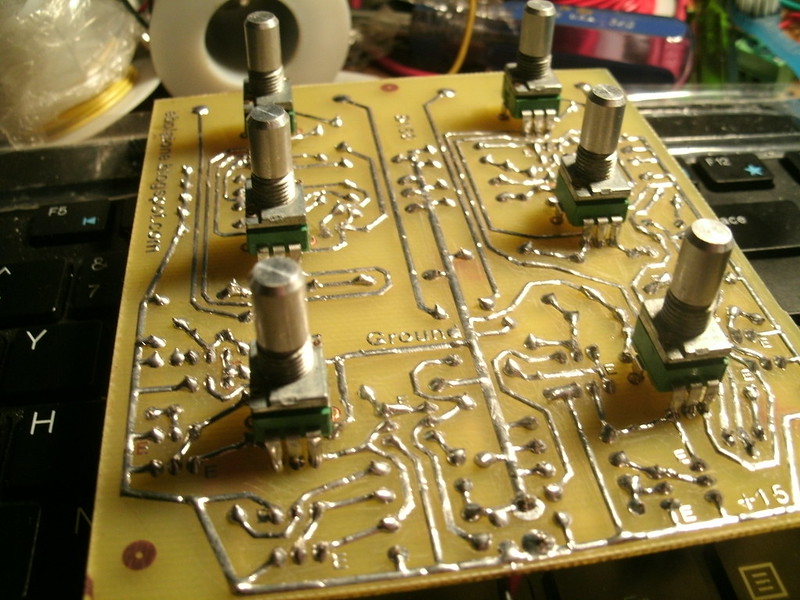
Important note: First solder the rear-most pots (250K) as seen below. The open space in front is required for ease of soldering. Then those in the center, etc.
Mount the potentiometers onto the PCB's solder side. Keeping each positioned well, solder the small pins to the traces. Be careful to not bridge across any of them. It's easy to do so. Test visually and with a beeping VOM continuity meter setting if need be. Remember to keep them nicely perpendicular to the PCB so they'll mount well to the front panel.
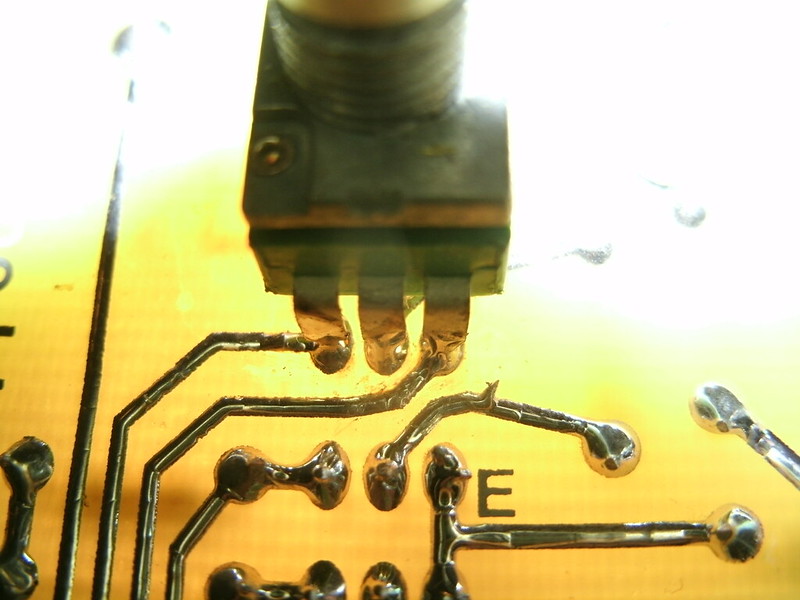
After soldering on the pots, look at the connections with a bright lamp behind the PCB. It's easy to bridge these connections so be sure they're all individual.
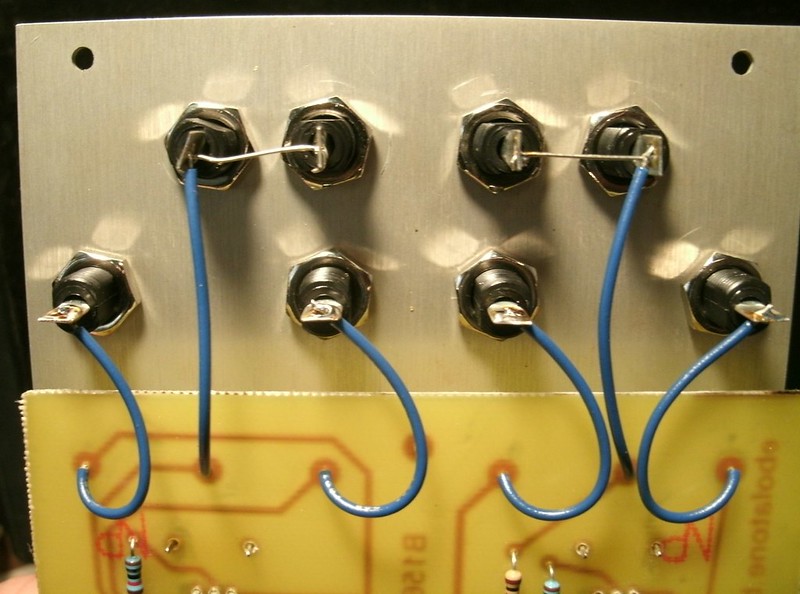
Front panel wiring.
SOLDER PINS BEFORE OR AFTER CHECKING WITH THE FRONT PANEL?
Mount the panel on the pots. Don't forget the three washers on each potentiometer between it and the front panel; this makes the Davies pots sit at a perfect height. Don't use a washer on the front panel side, just the nut.
Suggested front panel artwork:
For visual reference only. Click here to download the correctly-sized PDF. The front panel when drilled should mount perfectly to the potentiometers. There are three pads on the PCB for potential standoff mounting; 12mm might be a touch too short. They are definitely not mandatory.
The solder pads directly beneath each banana jack solders to that jack.
IMAGE
Many thanks to Mr. D for the curvy lines!
Testing the build
When you power up the module test it as follows.
Set both top pots fully to Int. Set both middle pots to fully left.
A DC volt meter connected to either set of Output jacks should show something between 0.1V and 0.4V.
Now set the center Offset pots to fully right. Each output should show a voltage around 14.8 volts.
To test the external mixers, set the module as follows.
Set the left Ext/Int pot fully to Ext. The center Offset pot is thus negated.
Set the right Ext/Int pot fully to Int. The right center Offset pot will be used to indicate correct response. Set it to fully left (0V).
Patch the right Output jack to the left-most Input banana jack. Set the left side's bottom pot fully to the left.
With a DC voltmeter connected to the left section's Output jack, you should see something between 0.1V and 0.4V. If not, you may have a transistor in backwards (I got one wrong and had a 2V reading).
Now turn the right section's middle pot to fully right (15V). The meter should read something around 14.8V.
(Remember that without something patched into the banana jack, the bottom sections will output about 12V each. This is normal.)
Now plug the patch cord from the right section's Output into the right input jack of the left side. Turn the bottom pot fully to the right. Changing the right section's middle pot should produce an around 0V through nearly 15V reading on the meter.
TESTING THE RIGHT SECTION
Set and patch the module as follows.
Patch the left section's Output into the right section's left input jack (not the Inverting jack). Set the right section's top pot to fully left (Ext). Set the bottom pot to fully left.
Set the left section's top pot to fully right (Int). Set the left section's middle pot to fully left (0V).
Connecting a DC voltmeter to the right section's Output jack, you should read a near zero voltage (0.1 through 0.4V). Turning the left section's middle pot fully to the right, you should read an increasing value ending nearly at 15V.
If these readings are the case, you are very nearly finished. Now to check the right section's Inverting input, which requires calibration.
Calibration:
There is only one trimpot and it is used for setting the inverting section of the second half.
Set the module as follows.
Left section:
-Int/Ext fully to Int.
-The middle pot should be fully to the right (outputs +15V).
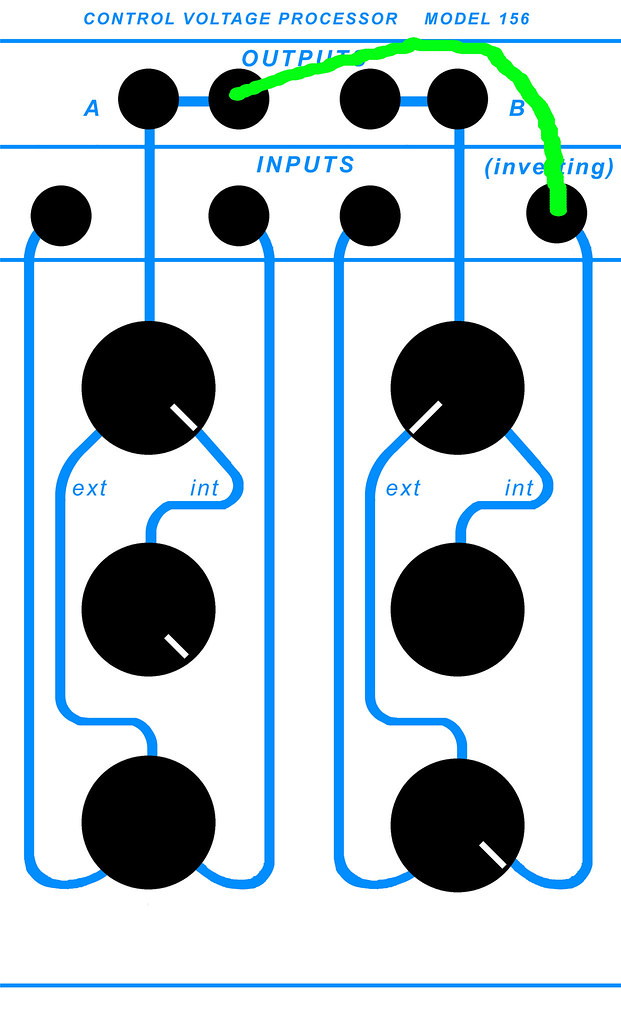
-Patch from the Out of the left half into the Inverting jack on the right.
This allows you to use the left side's center Offset pot to send 0-15V to the right section's Inverting input.
Right section:
-Set the Int/Ext fully to Ext.
-Set the bottom pot fully to the right.
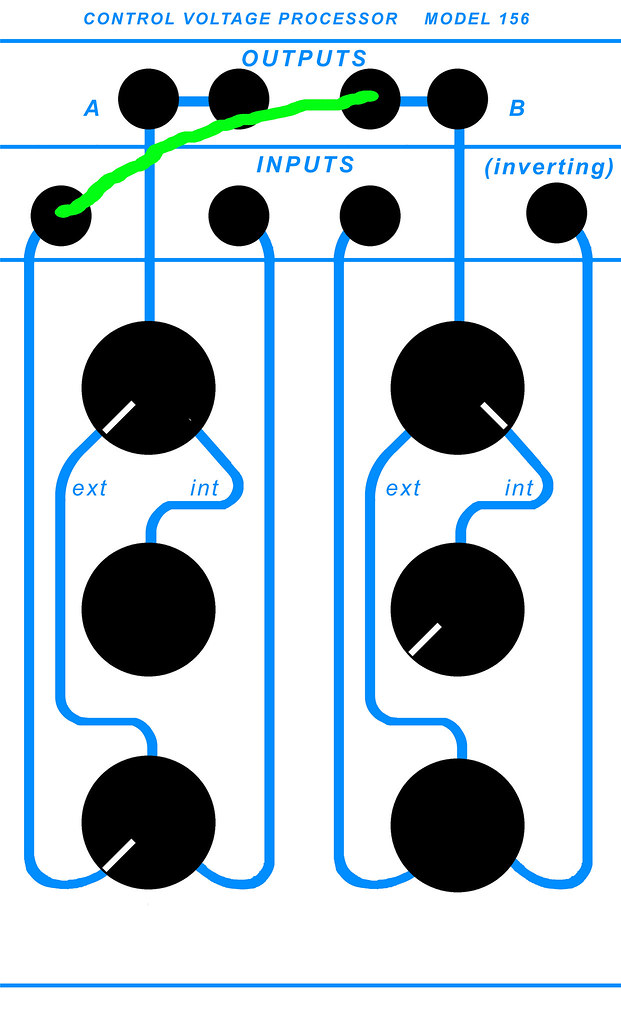
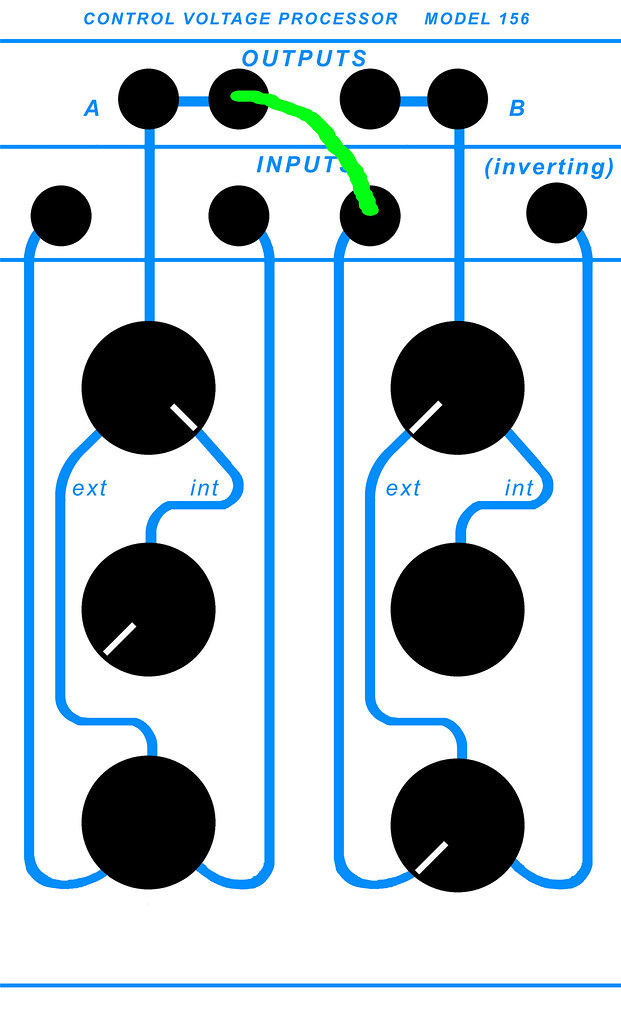
Follow the line from the right side's Inverting input jack to the bottom pot, which is set fully to pass the Inverting input. Setting the right side's Int/Ext pot to fully Ext fully passes that signal path to the output. The line graphics directly represent signal flow, of course.
-With a VOM reading DC voltage connected to the Output of the right section, turn the trimpot to about 0.3V. It should stop changing around there; set the trimpot for whatever minimum reading you can attain but don't go much beyond it or that will reduce the maximum voltage swing.
-Turn the left section's middle (Offset) pot to the left; the meter should show an increasing voltage with a maximum of greater than 14V but it might not quite make it to a full +15.
In other words, a voltage sweeping from +15V to 0V will output 0V to +15, and of course vice-versa.
If these are your readings, congratulations! You are ready to use your module. Once you've built one of these modules, you'll find the testing and calibration goes by very quickly.
In use:
Buchla 100 gear can be a bit odd when not patched; the 144 dual square wave generator, when switched to External CV modulation oscillates at a fairly high frequency and not its expected minimum of around 5Hz. Patch into the CV in jack, however, with 0V or so, and it will drop to 5Hz or so and sweep upwards from there.